Following up on my recent article about cross-compiling from Linux to Windows 98, I wanted to see if I could run a simple machine learning model on that same old laptop. To make the challenge more interesting, I quantized the model to use integer arithmetic only, allowing it to fully take advantage of the Pentium III CPU. I also used this project as an opportunity to test a new local LLM coding agent: Qwen 3.8, to see how it holds up against my usual go-to, Claude Opus 4.8.
The MLP model
I decided to keep things simple with a basic MLP instead of going for a CNN. On a Pentium III, every FLOP counts, and I wanted to make sure the model could run as fast as possible. The other reason is that optimizing inference on an MLP is much simpler than a CNN because it’s essentially running dot products. I also decided to skip any form of layer norm because implementing normalization within a pure integer pipeline would have made the quantization logic much more difficult to manage. Regarding the activation function, choosing ReLU was also driven by the need for simplicity; unlike Sigmoid or Tanh, which require expensive operations, ReLU is straightforward to implement with integer arithmetic. The final classification is determined by taking the argmax of the output layer’s logits, which is a trivial operation that requires no floating-point math and thus fits perfectly into our integer pipeline. Although the trade-off of using an MLP means slightly lower accuracy compared to a CNN, I was able to recover some of that accuracy by using data augmentation during the training process. In the end, my model reached an accuracy of about 98%, which is good enough to be usable, and to showcase my quantization strategy.
Following is the model written in PyTorch:
def __init__(self) -> None:
    super().__init__()
    self.fc1 = nn.Linear(784, 64)
    self.relu = nn.ReLU()
    self.fc2 = nn.Linear(64, 10)

def forward(self, x: torch.Tensor) -> torch.Tensor:
    x = x.view(x.size(0), -1)  # flatten to (batch, 784)
    x = self.relu(self.fc1(x))
    x = self.fc2(x)
    # The predicted digit is argmax(x)
    return x
Quantization
Usually quantization is done in a way that replaces some of the operations in a model with a float or an integer that has less precision than the original bfloat16 or float32 used at training time. This is done for two reasons, first loading the model will require significantly less space in VRAM, and second the computer that runs the model can use special hardware like Nvidia Tensor cores to accelerate computations using lower-precision numbers. Traditionally, the input to the model is still a floating point tensor, but internally (e.g., in a matrix multiply operation) heavy computations are done with integers. Sometimes two or more adjacent layers of the model can be fused to save even more time. For example in PyTorch, as of version 2.13, Linear layers are implemented with the matrix-vector multiplication quantized to integer, but the bias is still a floating point number. To push this challenge to its limit, I decided to quantize the entire model to integer, which means that there are absolutely no floating-point operations in the inference path.
When deciding how to quantize the model, it is very important to have the computing platform capabilities in mind. Since my CPU is 32 bits and supports MMX for integer operations, I need to quantize to a precision that can be efficiently multiplied and stored in a 32-bit integer. For example MMX does not provide a way to accelerate multiplications of 8-bit or 32-bit integers. The only multiplication instructions that MMX provide are for packed 16-bit integers. In particular for computing a matrix to vector product, which is essentially a dot product on all rows of the matrix, MMX provides the PMADDWD (Packed Multiply on Words and Add resulting pairs) instruction, which multiplies four pairs of signed 16-bit integers into 32-bit products, then adds adjacent pairs together to output two 32-bit results. To accumulate the sum of the results of all 32-bit products, we can use PADDD (Packed Add 32-bit Doublewords), which adds two pairs of 32-bit integers and stores it into one pair of 32-bit integers. To rescale vectors between linear layers, we can use PSRAD (Packed Shift Right Arithmetic Doubleword), which performs an arithmetic right shift that preserves the sign bit, allowing us to efficiently scale signed integers back into a smaller range.
PyTorch does not support quantization to int16 data types, only int8. That’s normal, using 16-bit integers is not enough of a saving to justify support on recent hardware; we might as well use bfloat16. So I had to do the quantization manually in PyTorch. For an MLP layer, we can quantize the weights and activations before the multiplication to 16 bits, and the bias terms to 32 bits. It works because multiplying two signed 16-bit numbers fits in a signed 32-bit number. All we need is to be very careful when quantizing, and keep track of the sum of all weights and activations in the matrix multiplication to avoid an overflow.
Following is the code I used for quantization:
def _symmetric_quantize(
    fp32: torch.Tensor,
    max_abs: torch.Tensor,
    qmax: int,
) -> tuple[torch.Tensor, float]:
    """Symmetric quantisation centred at zero.

    Maps ``fp32`` values to the range ``[-(qmax+1), qmax]``.
    For int8  : [-128, 127]
    For int16 : [-32768, 32767]

    Returns
    -------
    quantized : torch.Tensor
        Quantized tensor (dtype int16, same shape as *fp32*).
    scale : float
        Scale factor so that ``fp32 ≈ quantized * scale``.
    """
    assert max_abs != 0.0, "Cannot quantise a tensor with all zeros"

    scale = max_abs / qmax
    qmin = -(qmax + 1)
    quantized = (fp32 / scale).round().clamp(qmin, qmax)
    return quantized, scale
_symmetric_quantize is a function that does static quantization of a float32 tensor to an integer tensor. The quantization is centred around zero, and maps the maximum float value of the tensor to the maximum value a signed integer can represent. This means that if at runtime the quantized operation is given a number that’s greater than the maximum absolute value used during quantization, we will see overflow errors, so we need to be careful.
Now the more interesting part is how we can quantize a linear layer. Please read the comments in the code to better understand how the quantization is done. Basically, we need to be extremely careful when choosing the scale at which float32 numbers are rescaled before quantization so that we avoid overflows at runtime. Also, one very important detail is that when we do the matrix multiplication of two 16-bit integer tensors and it produces a 32-bit integer tensor, the scale of the resulting tensor is the product of the two scales. Therefore, the bias term, which is a 32-bit integer, must be quantized with a scale that is the product of the two scales of the weights and activation tensors. There is a chance that the actual scale for the bias is greater than that by the way, that’s why we have an assert to check for this in the code. In practice this never happens because the optimizer tries to push weights and biases towards zero to prevent values from getting too big.
def load_from_float(
    self,
    x: torch.Tensor,
    weight: torch.Tensor,
    bias: torch.Tensor,
) -> None:
    """Symmetrically quantise float32 weights and bias in-place."""
    # Find the scale for the input
    x_max_abs = x.abs().max().item()
    s_x = x_max_abs / self.qmax

    # Find the scale for the weights
    # Each component of the input multiplied by the weight matrix is the sum of 784 products,
    # so we need to make sure that the maximum value of the weight matrix is small enough to avoid overflow.
    # We consider that the input, which we don't control, can be at its maximum value, whereas the weight matrix is fixed.
    # Therefore, we compute the product wx_max and check what is the maximum absolute value in it.
    # We find the scale for the int32 so that the maximum theoretical value of the product is within the range of int32.
    # And since we compute the maximum value of the product, we need to divide it by the maximum value of the input to find the maximum value of the weight matrix.
    x_max = torch.ones_like(x) * x_max_abs
    wx_max = x_max @ weight.t()
    wx_max_abs = wx_max.abs().max().item()
    weight_max_abs = wx_max_abs / x_max_abs

    # The scale for the bias is the product of the input and weight scales
    # We make sure the final scale is equal to the product of the input and weight scales.
    # And qmax is squared because it is when b is added to W*x it's done in double the precision of W and x.
    bias_max_abs = x_max_abs * weight_max_abs
    assert bias_max_abs > bias.abs().max().item(), "Bias is too large for the input and weight scales"

    w_q, s_w = _symmetric_quantize(weight, weight_max_abs, self.qmax)
    b_q, s_b = _symmetric_quantize(bias, bias_max_abs, self.qmax * self.qmax)
One last thing, you may ask what happens between two consecutive linear layers in the model? Since each time we multiply two integers we end up with potentially an integer that requires double the precision, with two layers we might need to store the final result in 64-bit integers. That’s true, but since the output digit is predicted by an argmax, the scale of the last layer does not matter. Therefore, before the second layer, everything is rescaled to 16-bit integers with the following line:
x = torch.bitwise_right_shift(x, 16)
Hopefully, by the end of this section, you understand that my strategy for quantization was not just about making numbers smaller, it’s a bespoke optimization of the model specifically tailored to the Pentium III CPU from the year 2001.
Does quantization hurt accuracy?
A natural question at this point: does this very complicated integer quantization strategy cost us any accuracy? To find out, I took the trained MLP, quantized it with the strategy above, and evaluated both the original float32 model and the quantized one on the entire MNIST test set, directly in PyTorch on CPU. This Python pass is a faithful emulation of the integer pipeline that the C program runs, so that I don’t need to work on the C implementation just to test my quantization code.
The evaluation reports the per-layer quantization scales and maximum output errors, along with the final accuracy:
=== Quantized model evaluation ===
Float32  accuracy: 0.9749
Quantized accuracy: 0.9744
Delta:              -0.0005
That’s it: quantizing the entire model to pure integer arithmetic costs us a mere 0.05 points of accuracy. The largest error introduced by the quantization is about 0.04 at the first layer and about 0.008 at the output layer, which is small enough that the argmax almost never changes. In the case of this model, quantization to 16-bit integers is working great. We get the speedup without giving up any real accuracy.
C program to run the model on the laptop
The inference engine is written in C89 for maximum compatibility and minimal overhead. It was not necessary to use C89 as the program is cross-compiled from Linux using a recent version of GCC. I just think it’s fun to use a programming language that’s from the same era as the laptop. Inference is designed to perform a pure integer forward pass, mirroring the quantization logic used during training. The float32 MLP model is also implemented in the C program as a reference so that we can measure the speedup of using integer quantization.
The core of the inference engine is a highly optimized integer dot product operation (see the file int16_dot_x86_mmx.S). While I implemented a standard C version as a fallback, the performance really comes from the assembly-optimized kernel. This kernel uses unrolled loops and four independent MMX accumulators to hide the execution latency of the pmaddwd (Packed Multiply on Words and Add resulting pairs) instruction. Using this kernel is significantly more performant than the standard C code generated by GCC, which lacks these specific MMX optimizations.
Just as an aside, I found out why using MMX instructions is so difficult to handle for the compiler and I thought it would be interesting to share it with interested readers. To maximize backward compatibility, MMX registers are actually aliases for the existing x87 floating-point unit (FPU) registers. This design decision was made to ensure backward compatibility with older operating systems that were not MMX-aware. Since those operating systems wouldn’t know how to save and restore additional MMX registers during a context switch, Intel decided to reuse the existing x87 FPU registers—specifically using 64 bits of each 80-bit x87 register. This allowed older operating systems to remain fully compatible with MMX programs running on newer hardware, as they could continue to save/restore the entire CPU state. Smart! But also this trade-off comes with some tricky house cleaning tasks.
This aliasing of x87 registers means that any operation involving the floating-point stack can affect the MMX registers and vice versa. To switch between these modes, we must use the emms (Empty MMX State) instruction. However, calling emms is not free; it can take around 30 CPU cycles. This makes it crucial to minimize how often we switch modes. In our case, because the entire inference pipeline is integer-only, we can run the whole forward pass using MMX and then call emms just once at the very end of the inference function to mark the x87 FPU registers as available for floating-point instructions. If we had interspersed floating-point operations within our model, we would have to pay that 30-cycle penalty multiple times, significantly hurting performance. To handle this cleanly, I implemented a clear_mmx_state helper that uses the emms instruction in assembly.
Benchmarks
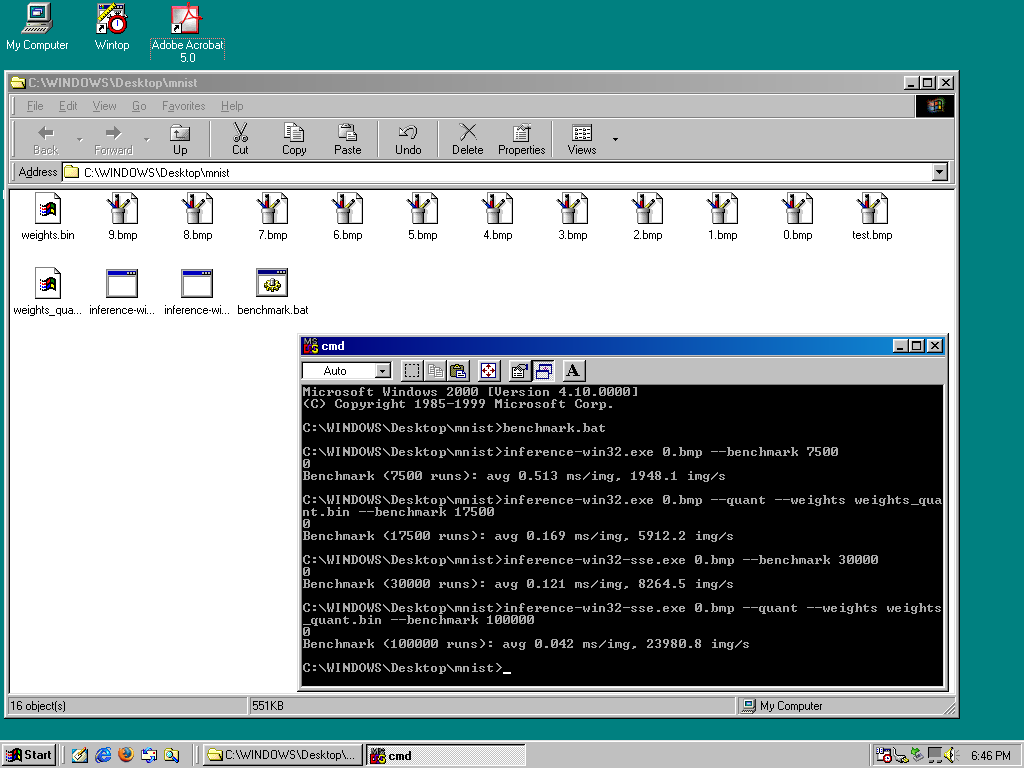
Pentium III 1.00 GHz/733 MHz
| Model | Architecture | Speed (img/s) | Speedup |
|---|---|---|---|
| Float | (no SSE) | 1,948 | 1.0x |
| Quantized | (no MMX) | 5,912 | 3.0x |
| Float | (SSE optimized) | 8,265 | 4.2x |
| Quantized | (MMX optimized) | 23,981 | 12.3x |
On the target architecture, that’s a 12.3 times speedup! Awesome!
Intel Core i7-10875H 4.70 GHz
Just to compare on recent hardware, I ran the same benchmark on my laptop.
| Model | Architecture | Speed (img/s) | Speedup |
|---|---|---|---|
| Float | (no SSE) | 10,001 | 1.0x |
| Quantized | (no MMX) | 57,419 | 5.7x |
| Float | (SSE optimized) | 87,523 | 8.8x |
| Quantized | (MMX optimized) | 301,537 | 30.2x |
Two things to note. First, the optimized model on ancient hardware beats the float model without any optimization on recent hardware. That’s interesting! Second, the speedup using SSE or MMX on recent hardware is greater than on ancient hardware. I guess the implementation of these instructions in hardware is done better?
Was Qwen 3.8 a good coding agent?
To be honest, Qwen 3.8 didn’t quite live up to the standard set by Claude Opus 4.8 for this particular project. One of the most noticeable issues was its tendency to overthink; it was quite evident in its reasoning traces, which sometimes felt like they were spiraling into unnecessary complexity. I’m not entirely sure if this was a matter of adjusting the thinking effort or perhaps an issue with how I was using the pi harness.
I suspect part of the problem was the nature of the task itself. I was pushing the model into quite an unconventional corner, asking it to implement a bespoke quantization strategy that likely isn’t well-represented in its training data. While Qwen might excel at more standard tasks like web development, this deep-dive into low-level assembly and non-standard integer arithmetic seems to be outside its comfort zone.
When I hit real roadblocks, especially with the tricky assembly unrolling, I used Gemini. Using Gemini to review my code and refine the initial Qwen drafts made a big difference. It was particularly helpful in guiding the assembly implementation, helping me unroll the loops and squeeze out extra performance.
Although the coding agents really helped me, there are two things that they could not figure out. The quantization function above, which uses different scales and integer precisions, was done entirely by me. They could not figure this out. To be transparent, it took me a few days of my free time too. Also, benchmarking and setting the emms instruction at the end of the inference function were done by me. Gemini really wanted to have it multiple times in the assembly function that rescales the vector between the two linear layers.
Future work
The next logical step is to see if this quantization strategy can be extended to Convolutional Neural Networks (CNNs). While MLPs are a great starting point for testing integer-only pipelines, CNNs are the backbone of modern computer vision. I’m curious to see if we can implement integer-only convolutions that maintain state-of-the-art accuracy while still reaping the massive throughput benefits of MMX instruction sets.
My source code
You can find the code associated with this post at mgaillard/mnist98 on GitHub.